no image
Linux 동적 분석 Tool
Monitoring ToolStrace 를 이용한 동작 확인 및 모니터링 의존성 문제로 인해 OS 별로 실행되지 않는 경우가 빈번할 수 있다. 이를 위해 해당 OS 에서 동작하는지 빠르게 확인하기 위해 사용하는 방법으로 Strace 가 존재한다. 아래 예시는 strace 로 "ls" 를 실행한 결과이다. 마지막에 exited with 0 으로 정상적으로 종료가 되었음을 확인 할 수 있다. remnux@remnux:~/Desktop$ strace ls execve("/bin/ls", ["ls"], [/* 68 vars */]) = 0 brk(0) = 0xbc1000 access("/etc/ld.so.nohwcap", F_OK) = -1 ENOENT (No such file or directory) acce..
2018.04.08
no image
XorDDos Analysis Report
개요기본적인 파일 정보는 아래와 같다. File Name : U******9 Diag Name : Linux/Xarceen.Gen Linux "file" 명령어를 통한 결과는 아래와 같다. 굵게 표시한 부분들을 통해 각각 32bit ELF 파일, 정적으로 컴파일, 스트립 되지 않은 파일임을 확인 할 수 있다. remnux@remnux:~/sample$ file U******9 UpTip999: ELF 32-bit LSB executable, Intel 80386, version 1 (SYSV), statically linked, for GNU/Linux 2.6.9, not stripped 요약해당 악성코드는 공격자에 의해 감염 후, 원격지와 통신을 수행한다. 이 통신을 통해 공격하고자 하는 대상의 IP ..
2018.04.08
no image
Kali Linux Commands Cheat Sheet
Reference : http://www.hacoder.com/2015/09/kali-linux-commands-cheat-sheet/ Kali Linux commands cheat sheet. All basic commands from A to Z in Kali Linux has been listed below.Aapropos : Search Help manual pages (man -k)apt-get : Search for and install software packages (Debian/Ubuntu)aptitude : Search for and install software packages (Debian/Ubuntu)aspell : Spell Checkerawk : Find and Replace ..
2015.10.09
GDB 사용법
GDB 사용법 *참조도서: "유닉스 리눅스 프로그래밍 필수 유틸리티" GDB 사용 방법 GDB를 이용하기 위해서는 컴파일 과정에서 디버깅 정보를 삽입해야 한다. 컴파일 시 옵션 'g' 이용 $ gcc -g -o main main.c 컴파일이 정상 종료 되면 GDB를 실행한다. gdb [프로그램명] $ gdb main gdb [프로그램명] [프로세스PID] $ gdb main 1928 GDB가 정상 실행되면 터미널의 프롬프트가 (gdb)로 바뀌게 된다. 종료방법에는 크게 두가지가 있다. ctrl + d (gdb) q (gdb) quit 옵션에 따라 실행중인 프로그램의 소스를 다양한 방법으로 볼 수 있다. l(list) list 10 list [함수명] list - //이전 10라인을 출력한다. list [..
2015.09.05
Kali linux 부팅 디스크 만들기
이걸로 유일하게 만들어졌다
2015.08.21
원격접속과 FTP
#Telnet & SSH 1.Telnet 텔넷 사용을 위해서는 텔넷 클라이언트와 텔넷 서버가 필요. Telnet은 수퍼데몬에 의해 동작하기에 xinetd를 설치해야한다. sudo apt-get install xinetd ... sudo apt-get install telnetd ... 텔넷 서버를 동작시키려면 /etc/xinetd.conf 파일을 설정해야함 service telnet disable = no flags = REUSE socket_type = stream wait = no user = root server = /usr/sbin/in.telnetd log_on_failure = USERID ~ :wq! 를 추가해야함 그후에 sudo /etc/init.d/xinetd restart 를 통해 활성..
2015.08.16
파일의 접근 권한,setuid,gid,스티키비트,chmod
#파일의 접근 권한ls -l 을 할경우-파일의 종류-접근권한표시-하드링크개수-로그인id-그룹id-파일크기-최종수정날짜-파일명 flie [filename] : 지정한 파일의 종류를 알려준다 groups [username] : 사용자가 속한 그룹을 알려준다. 표기방법 소유자 그룹 기타사용자 rwx rwx rwx접근권한 변경 chmod [option] file&directoryname *기호모드 u:파일소유자 g:소유자가 속한그룹 o:소유자와 그룹이외의 기타사용자 a:전체사용자 +:권한부여 -:권한제거 =:접근권한설정 r:읽기 w:쓰기 x:실행 *숫자모드 0-7 0-7 0-7 r-x : 4 0 1 = 5 rw- : 4 2 0 = 6 rwx : 4 2 1 = 8 rwxrwxrwx = 777 rwxr-xr-x =..
2015.08.16
리다이렉션
#입출력 방향바구기 파일 디스크립터0 stdin 명령어의 표준입력1 stdout 명령어의 표준출력2 stderr 명령어의 표준오류 표준 입출력 장치를 파일로 바꾸는 것을 '리다이렉션'이라한다.-출력 리다이렉션 파일 덮어쓰기 : > 명령 1> 파일이름 명령 > 파일이름 (확인을 할때는 cat을 통해 확인을 한다.) 파일에 내용추가 : >> 명령 >> 파일이름 -오류 리다이렉션 오류메세지를 위의 출력 리다이렉션처럼 > 으로 한다면 리다이렉션이 되지 않는다. 명령 2> 파일이름 ***결과를 무조건 '>'으로 담을수 있는 것이아니라 성공메세지는 1> 을 통하여 실패메세지는 2>를 통하여 리다이렉션 할 수 있다. //한번에 리다이렉션하기 ls ./abc>ls.out 2>ls.err //오류 메세지 버리기 /dev..
2015.08.16
Monitoring Tool

Strace 를 이용한 동작 확인 및 모니터링

의존성 문제로 인해 OS 별로 실행되지 않는 경우가 빈번할 수 있다. 이를 위해 해당 OS 에서 동작하는지 빠르게 확인하기 위해 사용하는 방법으로 Strace 가 존재한다.

아래 예시는 strace 로 "ls" 를 실행한 결과이다. 마지막에 exited with 0 으로 정상적으로 종료가 되었음을 확인 할 수 있다.

remnux@remnux:~/Desktop$ strace ls
execve("/bin/ls", ["ls"], [/* 68 vars */]) = 0
brk(0)                                  = 0xbc1000
access("/etc/ld.so.nohwcap", F_OK)      = -1 ENOENT (No such file or directory)
access("/etc/ld.so.preload", R_OK)      = -1 ENOENT (No such file or directory)
open("/etc/ld.so.cache", O_RDONLY|O_CLOEXEC) = 3
fstat(3, {st_mode=S_IFREG|0644, st_size=107852, ...}) = 0
mmap(NULL, 107852, PROT_READ, MAP_PRIVATE, 3, 0) = 0x7f5b620e9000
close(3)                                = 0
access("/etc/ld.so.nohwcap", F_OK)      = -1 ENOENT (No such file or directory)
open("/lib/x86_64-linux-gnu/libselinux.so.1", O_RDONLY|O_CLOEXEC) = 3
...........
mmap(NULL, 4096, PROT_READ|PROT_WRITE, MAP_PRIVATE|MAP_ANONYMOUS, -1, 0) = 0x7f5b62103000
write(1, "linux_server  REMnux Cheat Sheet"..., 66linux_server  REMnux Cheat Sheet  REMnux Docs  REMnux Tools Sheet
) = 66
close(1)                                = 0
munmap(0x7f5b62103000, 4096)            = 0
close(2)                                = 0
exit_group(0)                           = ?
+++ exited with 0 +++


Sysdig 를 이용한 모니터링
다양한 필터를 가지고 있으며, Windows 의 Procmon 같은 녀석


Network 관련 도구

WireShark 를 통한 네트워크 패킷 분석


netstat -anp 를 통해 네트워크 연결 상태 조회


Windows 의 TCPView 와 같은 명렁어
$ watch -pn 0.1 "netstat -nap"


Process 관련 도구

ps -e -f | grep ~~~


pstree


Gnome-System-monitor


htop


'Reversing > Theory' 카테고리의 다른 글

SysAnalyzer Tool (동적분석 도구)  (3) 2019.01.04
IQY File - Using Malware Campaign  (0) 2018.10.23
Process Doppelganging  (0) 2018.02.13
Dynamic Data Exchange (DDE)  (0) 2017.11.12
Atombombing 기법  (0) 2017.05.28
개요

기본적인 파일 정보는 아래와 같다.

File Name : U******9
Diag Name : Linux/Xarceen.Gen

Linux "file" 명령어를 통한 결과는 아래와 같다.  굵게 표시한 부분들을 통해 각각 32bit ELF 파일, 정적으로 컴파일, 스트립 되지 않은 파일임을 확인 할 수 있다.
remnux@remnux:~/sample$ file U******9
UpTip999: ELF 32-bit LSB  executable, Intel 80386, version 1 (SYSV), statically linked, for GNU/Linux 2.6.9, not stripped


요약

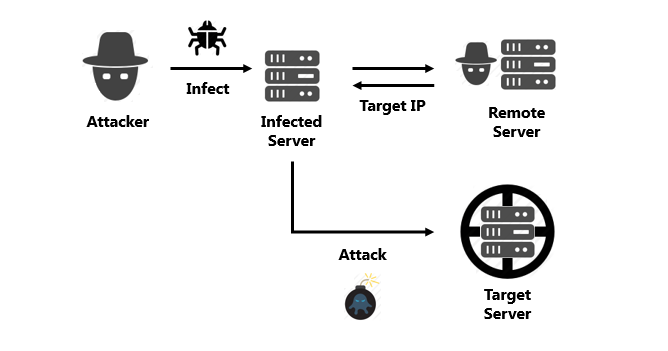
해당 악성코드는 공격자에 의해 감염 후, 원격지와 통신을 수행한다. 이 통신을 통해 공격하고자 하는 대상의 IP 주소를 얻어온다. 그 후 대량의 Packet 을 대상 주소로 전송하는 악성코드이다.


분석

자가 복사

해당 샘플의 경우 대상 환경에서의 지속성을 향상시키기 위하여 자기 자신을 복사한다. 복사되는 경로는 아래와 같다.
  • /usr/bin/{random_filename}
  • /bin/{random_filename}
  • /tmp/{random_filename}
  • /lib/libudev4.so


지속성 유지
추가적으로 악성 샘플을 다시 실행시키기 위해 '/etc/crontab' 파일을 변조한다. crontab 파일은 Windows 의 작업 스케쥴러와 같은 역할을 하며, 맨 마지막 줄의 내용이 추가된 것을 확인 할 수 있다. 해당 내용은 3분 마다 /etc/cron.hourly/gcc4.sh 를 실행하는 것이다.

remnux@remnux:~/test$ cat /etc/crontab
# /etc/crontab: system-wide crontab
# Unlike any other crontab you don't have to run the `crontab'
# command to install the new version when you edit this file
# and files in /etc/cron.d. These files also have username fields,
# that none of the other crontabs do.

SHELL=/bin/sh
PATH=/usr/local/sbin:/usr/local/bin:/sbin:/bin:/usr/sbin:/usr/bin

# m h dom mon dow user command
17 * * * * root cd / && run-parts --report /etc/cron.hourly
25 6 * * * root test -x /usr/sbin/anacron || ( cd / && run-parts --report /etc/cron.daily )
47 6 * * 7 root test -x /usr/sbin/anacron || ( cd / && run-parts --report /etc/cron.weekly )
52 6 1 * * root test -x /usr/sbin/anacron || ( cd / && run-parts --report /etc/cron.monthly )
#
*/3 * * * * root /etc/cron.hourly/gcc4.sh


gcc4.sh 는 상기에 설명한 바와 같이 복사한 자기 자신(/lib/libudev4.so) 을 libude4.so.6 라는 이름으로 복사 후 실행시키는 내용이다.

remnux@remnux:~/test$ cat /etc/cron.hourly/gcc4.sh
#!/bin/sh
PATH=/bin:/sbin:/usr/bin:/usr/sbin:/usr/local/bin:/usr/local/sbin:/usr/X11R6/bin
cp /lib/libudev4.so /lib/libudev4.so.6
/lib/libudev4.so.6


/etc/init.d 에도 Random 한 이름을 파일을 생성한다. 

remnux@remnux:~/test$ cat /etc/init.d/{random_filename}
#!/bin/sh
# chkconfig: 12345 90 90
# description:{random_filename}
### BEGIN INIT INFO
# Provides:{random_filename}
# Required-Start:
# Required-Stop:
# Default-Start: 1 2 3 4 5
# Default-Stop:
# Short-Description: {random_filename}
### END INIT INFO
case $1 in
start)
/usr/bin/{random_filename}
;;
stop)
;;
*)
/usr/bin/{random_filename}
;;
esac


또한 "/etc/rc*.d" 경로 밑에 S90{random_filename} 의 형태로 위의 "/etc/init.d/{random_filename}" 을 가리키는 Link 파일을 생성한다. 여기서 rc*.d 폴더는 부팅 레벨에 따라, 각각의 부팅 레벨 폴더에 있는 파일들을 자동으로 실행하는 경로이다.


네트워크 (DDoS)

아래 주소를 DNS 요청으로 얻어오며, TCP Packet 과 UDP Packet 을 전송하는 것을 확인 할 수 있다. 해당 주소로부터 공격 대상에 대한 IP 주소를 받아온다.
  • 114.***.***.114 ; 중국의 네임 서버
  • 137.***.***.224 ; 원격지 주소 (공격 대상의 주소를 얻어옴)


원격지와의 통신을 통해 암호화 된 공격 대상의 IP 주소를 받아온다. 그 후 encrypt_code 부분을 통해 XOR 연산을 하여 해당 내용을 복호화 한다. 분석 당시ㅡ복호화 된 내용을 보면 0xc******8 로 IP 주소 104.***.***.203 을 가리키고 있다.


공격 대상의 주소를 가지고 온 뒤, 아래와 같이 대상 주소에 수 많은 패킷을 보낸다. 과도한 Packet 전송 동작 등을 보아 DDoS 공격 행위로 추정된다.


분석 당시ㅡ공격 대상이 되는 곳에 대해 조사한 결과, 아래와 같이 SharkTech 라는 곳을 알 수 있었다. 또한 대상은 DDoS 보호 서비스와 관련 된 사이트임을 알 수 있다.


기타
# 1
실행 시 자신을 Background 에서 실행되도록 한다.


#2
통신 중 지정 된 신호를 받을 경우 다운로드 동작을 수행 할 수 있다. 다운로드 주소는 공격자가 지정 할 수 있으며, 다운로드 완료 후 해당 파일을 실행한다.


#3
해당 샘플이 통신하는 dns.bbgbbg.top 의 경우 Whois 결과가 아래와 같다. 이는 whois guard 에 의해 보호된 주소임을 알 수 있다.

Domain Name: b****g.t*p
Registry Domain ID: D20160920G10001G_81549331-top
Registrar WHOIS Server: whois.namecheap.com
Updated Date: 2016-09-20T00:04:28Z
Creation Date: 2016-09-20T00:04:24Z
Registry Expiry Date: 2020-09-20T00:04:24Z
Registrar: Namecheap Inc.
Registrar IANA ID: 1068
Registrar Abuse Contact Email: abuse@namecheap.com
Registrar Abuse Contact Phone: +1.6613102107
Domain Status: clientTransferProhibited https://icann.org/epp#clientTransferProhibited
Registry Registrant ID: C20160920C_09331172-top
Registrant Name: WhoisGuard Protected
Registrant Organization: WhoisGuard, Inc.
Registrant Street: P.O. Box 0823-03411
Registrant City: Panama
Registrant State/Province: Panama
Registrant Postal Code: 0
Registrant Country: PA
Registrant Phone: +507.8365503
Registrant Phone Ext:
Registrant Fax: +51.17057182
Registrant Fax Ext:
Registry Admin ID: C20160920C_09331173-top
Admin Name: WhoisGuard Protected
Admin Organization: WhoisGuard, Inc.


#4
지속적으로 랜덤한 문자열을 생성 후, "/lib/libudev4.so" 를 해당 이름으로 복사한다. 그리고 한번에 5개씩 해당 이름으로 프로세스를 생성한다.  하기의 동작은 반복적으로 이루어지기 때문에, 반복적으로 생성&소멸 된다.


이 때,  기존의 랜덤한 이름의 또 다른 자기 자신은 아래와 같이 삭제한다.


#5
프로세스의 도입부에서 아래의 문자열을 복호화한다.
cat resolv.conf
sh
bash
su
ps -ef
ls
ls -la
top
netstat -an
netstat -an
top
grep "A"
sleep 1
cd /etc
echo "find"
ifconfig eth0
ifconfig
route -n
gnome-terminal
id
who
whoami
pwd
uptime

복호화 된 문자들은 아래와 같이 execve 명령을 통해 악성프로세스의 인자로 주어지게 된다.


대응 방안

프로세스 종료

동작 중인 프로세스에 대해 종료해야 한다. 종료하고자 하는 프로세스의 이름은 아래와 같은 형태이며, 동일한 이름을 가진 5개의 프로세스와, 자식-부모 관계를 갖고 있는 4개의 프로세스를 추가로 삭제해야 한다.
  • {random_10_chrar_filename}

파일 삭제
악성코드가 감염 환경에서의 지속성을 유지하기 위한 요소들을 제거해야 한다.
  • /usr/bin/{random_filename}
  • /bin/{random_filename}
  • /tmp/{random_filename}
  • /etc/rc*.d/S90{{random_filename}
  • /etc/init.d/{random_filename}
  • /etc/cron.hourly/gcc4.sh


고려 사항

  • 잔여 프로세스가 계속 실행되고 있음ㅡ아마 잔여프로세스가 새로운 이름으로 원본 파일을 실행할 것으로 추정
  • crontab 에 의해 3분마다 다시 프로세스 실행
  • 이와 같은 경우 Windows 라면 메모리 진단 및 치료를 수행, 하지만 수동 치료의 경우에는?


Reference :  http://www.hacoder.com/2015/09/kali-linux-commands-cheat-sheet/


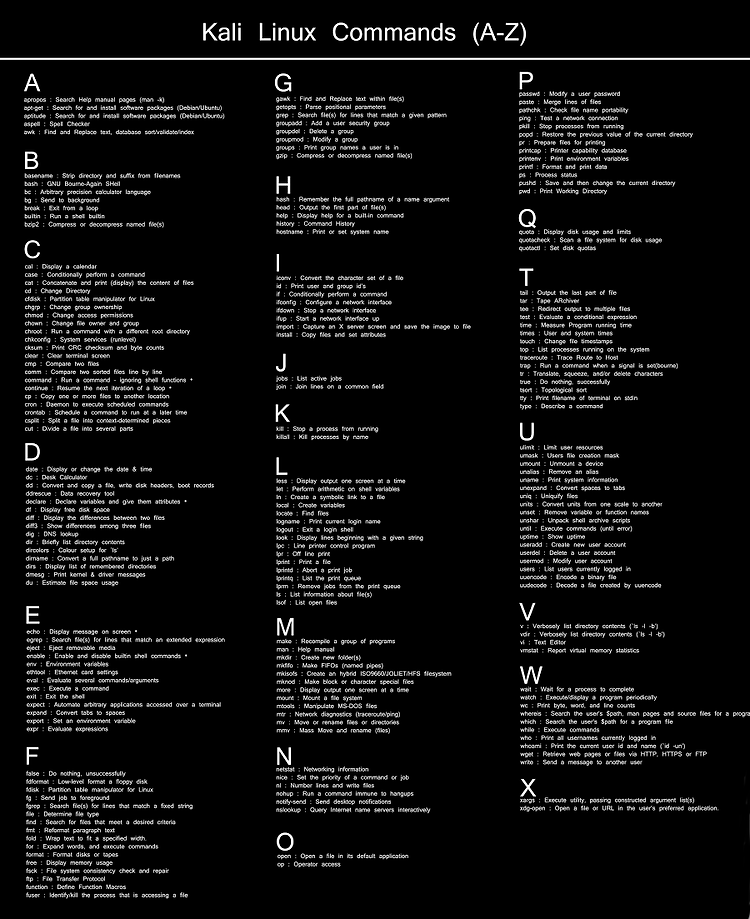
Kali Linux commands cheat sheet. All basic commands from A to Z in Kali Linux has been listed below.

A

  • apropos : Search Help manual pages (man -k)
  • apt-get : Search for and install software packages (Debian/Ubuntu)
  • aptitude : Search for and install software packages (Debian/Ubuntu)
  • aspell : Spell Checker
  • awk : Find and Replace text, database sort/validate/index

B

  • basename : Strip directory and suffix from filenames
  • bash : GNU Bourne-Again SHell
  • bc : Arbitrary precision calculator language
  • bg : Send to background
  • break : Exit from a loop
  • builtin : Run a shell builtin
  • bzip2 : Compress or decompress named file(s)

C

  • cal : Display a calendar
  • case : Conditionally perform a command
  • cat : Concatenate and print (display) the content of files
  • cd : Change Directory
  • cfdisk : Partition table manipulator for Linux
  • chgrp : Change group ownership
  • chmod : Change access permissions
  • chown : Change file owner and group
  • chroot : Run a command with a different root directory
  • chkconfig : System services (runlevel)
  • cksum : Print CRC checksum and byte counts
  • clear : Clear terminal screen
  • cmp : Compare two files
  • comm : Compare two sorted files line by line
  • command : Run a command – ignoring shell functions •
  • continue : Resume the next iteration of a loop •
  • cp : Copy one or more files to another location
  • cron : Daemon to execute scheduled commands
  • crontab : Schedule a command to run at a later time
  • csplit : Split a file into context-determined pieces
  • cut : Divide a file into several parts

D

  • date : Display or change the date & time
  • dc : Desk Calculator
  • dd : Convert and copy a file, write disk headers, boot records
  • ddrescue : Data recovery tool
  • declare : Declare variables and give them attributes •
  • df : Display free disk space
  • diff : Display the differences between two files
  • diff3 : Show differences among three files
  • dig : DNS lookup
  • dir : Briefly list directory contents
  • dircolors : Colour setup for `ls’
  • dirname : Convert a full pathname to just a path
  • dirs : Display list of remembered directories
  • dmesg : Print kernel & driver messages
  • du : Estimate file space usage

E

  • echo : Display message on screen •
  • egrep : Search file(s) for lines that match an extended expression
  • eject : Eject removable media
  • enable : Enable and disable builtin shell commands •
  • env : Environment variables
  • ethtool : Ethernet card settings
  • eval : Evaluate several commands/arguments
  • exec : Execute a command
  • exit : Exit the shell
  • expect : Automate arbitrary applications accessed over a terminal
  • expand : Convert tabs to spaces
  • export : Set an environment variable
  • expr : Evaluate expressions

F

  • false : Do nothing, unsuccessfully
  • fdformat : Low-level format a floppy disk
  • fdisk : Partition table manipulator for Linux
  • fg : Send job to foreground
  • fgrep : Search file(s) for lines that match a fixed string
  • file : Determine file type
  • find : Search for files that meet a desired criteria
  • fmt : Reformat paragraph text
  • fold : Wrap text to fit a specified width.
  • for : Expand words, and execute commands
  • format : Format disks or tapes
  • free : Display memory usage
  • fsck : File system consistency check and repair
  • ftp : File Transfer Protocol
  • function : Define Function Macros
  • fuser : Identify/kill the process that is accessing a file

G

  • gawk : Find and Replace text within file(s)
  • getopts : Parse positional parameters
  • grep : Search file(s) for lines that match a given pattern
  • groupadd : Add a user security group
  • groupdel : Delete a group
  • groupmod : Modify a group
  • groups : Print group names a user is in
  • gzip : Compress or decompress named file(s)

H

  • hash : Remember the full pathname of a name argument
  • head : Output the first part of file(s)
  • help : Display help for a built-in command
  • history : Command History
  • hostname : Print or set system name

I

  • iconv : Convert the character set of a file
  • id : Print user and group id’s
  • if : Conditionally perform a command
  • ifconfig : Configure a network interface
  • ifdown : Stop a network interface
  • ifup : Start a network interface up
  • import : Capture an X server screen and save the image to file
  • install : Copy files and set attributes

J

  • jobs : List active jobs
  • join : Join lines on a common field

K

  • kill : Stop a process from running
  • killall : Kill processes by name

L

  • less : Display output one screen at a time
  • let : Perform arithmetic on shell variables
  • ln : Create a symbolic link to a file
  • local : Create variables
  • locate : Find files
  • logname : Print current login name
  • logout : Exit a login shell
  • look : Display lines beginning with a given string
  • lpc : Line printer control program
  • lpr : Off line print
  • lprint : Print a file
  • lprintd : Abort a print job
  • lprintq : List the print queue
  • lprm : Remove jobs from the print queue
  • ls : List information about file(s)
  • lsof : List open files

M

  • make : Recompile a group of programs
  • man : Help manual
  • mkdir : Create new folder(s)
  • mkfifo : Make FIFOs (named pipes)
  • mkisofs : Create an hybrid ISO9660/JOLIET/HFS filesystem
  • mknod : Make block or character special files
  • more : Display output one screen at a time
  • mount : Mount a file system
  • mtools : Manipulate MS-DOS files
  • mtr : Network diagnostics (traceroute/ping)
  • mv : Move or rename files or directories
  • mmv : Mass Move and rename (files)

N

  • netstat : Networking information
  • nice Set : the priority of a command or job
  • nl Number : lines and write files
  • nohup : Run a command immune to hangups
  • notify-send : Send desktop notifications
  • nslookup : Query Internet name servers interactively

O

  • open : Open a file in its default application
  • op : Operator access

P

  • passwd : Modify a user password
  • paste : Merge lines of files
  • pathchk : Check file name portability
  • ping : Test a network connection
  • pkill : Stop processes from running
  • popd : Restore the previous value of the current directory
  • pr : Prepare files for printing
  • printcap : Printer capability database
  • printenv : Print environment variables
  • printf : Format and print data •
  • ps : Process status
  • pushd : Save and then change the current directory
  • pwd : Print Working Directory

Q

  • quota : Display disk usage and limits
  • quotacheck : Scan a file system for disk usage
  • quotactl : Set disk quotas

R

  • ram : ram disk device
  • rcp : Copy files between two machines
  • read : Read a line from standard input
  • readarray : Read from stdin into an array variable
  • readonly : Mark variables/functions as readonly
  • reboot : Reboot the system
  • rename : Rename files
  • renice : Alter priority of running processes
  • remsync : Synchronize remote files via email
  • return : Exit a shell function
  • rev : Reverse lines of a file
  • rm : Remove files
  • rmdir : Remove folder(s)
  • rsync : Remote file copy (Synchronize file trees)

S

  • screen : Multiplex terminal, run remote shells via ssh
  • scp : Secure copy (remote file copy)
  • sdiff : Merge two files interactively
  • sed : Stream Editor
  • select : Accept keyboard input
  • seq : Print numeric sequences
  • set: Manipulate shell variables and functions
  • sftp : Secure File Transfer Program
  • shift : Shift positional parameters
  • shopt : Shell Options
  • shutdown : Shutdown or restart linux
  • sleep : Delay for a specified time
  • slocate : Find files
  • sort : Sort text files
  • source : Run commands from a file `.’
  • split : Split a file into fixed-size pieces
  • ssh : Secure Shell client (remote login program)
  • strace : Trace system calls and signals
  • su : Substitute user identity
  • sudo : Execute a command as another user
  • sum : Print a checksum for a file
  • suspend : Suspend execution of this shell
  • symlink : Make a new name for a file
  • sync : Synchronize data on disk with memory

T

  • tail : Output the last part of file
  • tar : Tape ARchiver
  • tee : Redirect output to multiple files
  • test : Evaluate a conditional expression
  • time : Measure Program running time
  • times : User and system times
  • touch : Change file timestamps
  • top : List processes running on the system
  • traceroute : Trace Route to Host
  • trap : Run a command when a signal is set(bourne)
  • tr : Translate, squeeze, and/or delete characters
  • true : Do nothing, successfully
  • tsort : Topological sort
  • tty : Print filename of terminal on stdin
  • type : Describe a command

U

  • ulimit : Limit user resources
  • umask : Users file creation mask
  • umount : Unmount a device
  • unalias : Remove an alias
  • uname : Print system information
  • unexpand : Convert spaces to tabs
  • uniq : Uniquify files
  • units : Convert units from one scale to another
  • unset : Remove variable or function names
  • unshar : Unpack shell archive scripts
  • until : Execute commands (until error)
  • uptime : Show uptime
  • useradd : Create new user account
  • userdel : Delete a user account
  • usermod : Modify user account
  • users : List users currently logged in
  • uuencode : Encode a binary file
  • uudecode : Decode a file created by uuencode

V

  • v : Verbosely list directory contents (`ls -l -b’)
  • vdir : Verbosely list directory contents (`ls -l -b’)
  • vi : Text Editor
  • vmstat : Report virtual memory statistics

W

  • wait : Wait for a process to complete
  • watch : Execute/display a program periodically
  • wc : Print byte, word, and line counts
  • whereis : Search the user’s $path, man pages and source files for a program
  • which : Search the user’s $path for a program file
  • while : Execute commands
  • who : Print all usernames currently logged in
  • whoami : Print the current user id and name (`id -un’)
  • wget : Retrieve web pages or files via HTTP, HTTPS or FTP
  • write : Send a message to another user

x

  • xargs : Execute utility, passing constructed argument list(s)
  • xdg-open : Open a file or URL in the user’s preferred application.


'O / S > Linux' 카테고리의 다른 글

GDB 사용법  (0) 2015.09.05
Kali linux 부팅 디스크 만들기  (0) 2015.08.21
원격접속과 FTP  (0) 2015.08.16
파일의 접근 권한,setuid,gid,스티키비트,chmod  (0) 2015.08.16
리다이렉션  (0) 2015.08.16

GDB 사용법

Kail-KM
|2015. 9. 5. 02:37

GDB 사용법


*참조도서: "유닉스 리눅스 프로그래밍 필수 유틸리티"

GDB 사용 방법

<<실행>>
GDB를 이용하기 위해서는 컴파일 과정에서 디버깅 정보를 삽입해야 한다.

    컴파일 시 옵션 'g' 이용
    $ gcc -g -o main main.c

컴파일이 정상 종료 되면 GDB를 실행한다.

    gdb [프로그램명]
    $ gdb main
    gdb [프로그램명] [프로세스PID]
    $ gdb main 1928

GDB가 정상 실행되면 터미널의 프롬프트가 (gdb)로 바뀌게 된다.

<<종료>>
종료방법에는 크게 두가지가 있다.

    ctrl + d
    (gdb) q
    (gdb) quit

<<소스보기>>
옵션에 따라 실행중인 프로그램의 소스를 다양한 방법으로 볼 수 있다.

    l(list)
    list 10
    list [함수명]
    list -  //이전 10라인을 출력한다.
    list [파일명]:[함수명]
    list [파일명]:10

list 명령어를 사용하면 소스코드가 10줄 단위로 출력된다.
다음의 명령을 통해 출력단위를 변경할 수 있다.

    set listsize 20

<<세그멘테이션 폴트가 발생했을대>>
컴파일한 프로그램을 실행했을때 segmentation fault 가 발생하여
비정상 종료되었다면 다음의 명령어를 통해 오류 지점을 확인할 수 있다.

    (gdb) r(run)

run 명령어는 GDB가 프로그램을 실행시켜 이상이 발생했을때의 파일과 지점을 출력해준다.
또한 관련 함수 또는 변수에 담긴 값을 출력하여 오류수정에 많은 도움을 준다.

오류 지점에 도달하기 전 과정을 확인하기 위해서는 다음 명령어를 이용하면 된다.

    (gdb) bt

bt명령어는 백트레이스로 프로그램 스택을 역으로 탐색한다.

<<브레이크포인트>>
브레이크포인트는 다음의 방법들을 통해 설정 가능하다.

    (GDB) b(break) [함수명]
    (GDB) break 10
    (GDB) break [파일명]:[함수명]
    (GDB) break [파일명]:10
    (GDB) break +2  //현재 행에서 2개 행 이후 브레이크포인트 설정
    (GDB) break -2  //현재 행에서 2개 행 이전 브레이크포인트 설정
    (GDB) break *0x8049000  //메모리주소에 설정(어셈블리로 디버깅시 이용)
    (GDB) break 10 if var == 0  //var 변수의 값이 0일때 10번 행에 설정

브레이크포인트의 발동 조건은 다양하게 변경 가능하다.

    (GDB) condition [N] var == 0   //var변수가 0일때 N번 브레이크포인트 동작
    (GDB) condition [N] func(i) > 5

현재 설정된 브레이크포인트의 목록은 다음의 명령으로 확인 가능하다.

    (GDB) info break

브레이크포인트는 GDB가 종료될때까지 유효하다.
따라서 필요없을때는 다음의 방법들을 통해 설정을 지운다.

    (GDB) cl(clear) [함수명]
    (GDB) clear 10
    (GDB) clear [파일명]:[함수명]
    (GDB) clear [파일명]:10
    (GDB) d   //모든 브레이크포인트 지움
    (GDB) disable br  //모든 브레이크포인트 비활성화
    (GDB) disable br 1 3  //1번, 3번 브레이크포인트 비활성화
    (GDB) ensable br  //모든 브레이크포인트 활성화
    (GDB) ensable br 1 3  //1번, 3번 브레이크포인트 활성화

<<프로그램 실행>>
프로그램의 실행은 run 명령어를 이용한다.
만일 이미 실행중일때는 재실행한다.

    (gdb) r(run)

프로그램 실행시 인자를 지정하기 위해서는 다음과 같이 이용한다.

    (gdb) run arg1 arg2

실행중인 프로그램을 종료할 때는 kill 명령어를 이용한다.

    (gdb) k(kill)

현재 실행중인 행의 수행을 멈추기 위해서는 step 명령어를 이용한다.
step 명령어는 한행씩 동작하도록 한다. next 명령어와는 함수 호출시 다른 결과를 보인다.

    (gdb) s(step)
    (gdb) step 6   //step을 6번 수행

현재 행의 실행이 멈춘상태에서 다음 행을 실행하기 위해서는

    (gdb) n(next)
    (gdb) next 6   //next를 6번 수행

만일 step명령을 이용중 루프에 빠져 나오지 못할경우에는 until 명령어를 이용한다.

    (gdb) u(until)

한행씩이 아닌 다시 연달아서 실행하기 위해서는

    (gdb) c(continue)

함수가 매우 길어 끝나는 지점으로 이동하기 위해서는 finish 명령어를 사용한다.

    (gdb) finish

함수의 남은 부부을 수행하지 않고 빠져나오기 위해서는 return 명령어를 사용한다.

    (gdb) return

return 명령어를 사용시 return 값을 임의로 지정하기 위해서는 다음과 같이 이용한다.

    (gdb) return 1234

<<와치포인트 설정>>
와치포인트는 변수값의 변화와 코드의 변화를 확인할때 편리하게 이용가능하다.

    (gdb) watch [변수명]   //변수에 값이 써질 때 브레이크
    (gdb) rwatch [변수명]  //변수의 값이 읽혀질 때 브레이크
    (gdb) awatch [변수명]  //변수에 읽기, 쓰기 경우에 브레이크

<<변수와 레지스터 값 검사>>
현재 위치한 행에서 접근 가능한 지역변수들 목록 확인

    (gdb) info locals

현재 위치한 행에서 접근 가능한 전역변수들 목록 확인

    (gdb) info variables

확인하고싶은 변수의 값을 출력하기 위해서는 print 명령어를 사용한다.

    (gdb) p(print) [변수명]  //변수의 값
    (gdb) print [함수명]   //함수의 주소 값

포인터 변수의 경우 위의 방법으로 하면 주소값만이 출력된다.
포인터 변수의 값 또는 포인터 구조체 등의 값을 보기 위해서는 * 를 붙여준다.

    (gdb) print *[변수명]

이중 포인터라면 ** 를 붙여준다.

GDB는 변수 뿐만 아니라 레지스터의 값도 확인할 수 있다.

    (gdb) print $[레지스터명]

print 명령어는 지역변수를 우선하여 보여주기 때문에
지역변수와 전역변수에서 동일한 이름을 사용할때 전역변수를 확인하기 위해서는 :: 을 이용한다.

    (gdb) print 'main.c'::[변수명]

파일명은 '따옴표' 으로 감싸야한다.

특정 함수에 있는 변수를 확인하기 위해서는

    (gdb) print [함수명]::[변수명]

print 명령어로 변수 또는 레지스터를 확인할 때는 기본적으로 10진수로 출력한다.
이를 다른 형식으로 보고싶을 때는 다음과 같은 방법을 이용한다.

    (gdb) print/t [변수명]    //2진수로
    (gdb) print/o [변수명]    //8진수로
    (gdb) print/d [변수명]    //10진수로 (int)
    (gdb) print/u [변수명]    //부호없는 10진수로 (unsigned int)
    (gdb) print/x [변수명]    //16진수로
    (gdb) print/c [변수명]    //최초 1바이트 값을 문자형으로
    (gdb) print/f [변수명]    //부동소수점값
    (gdb) print/a [변수명]    //가장 가까운 심볼의 오프셋

print 명령어는 값을 보여줄뿐 아니라 값을 설정하는 것도 가능하다.

    (gdb) print [변수명] = [값]

<<화면에 변수의 값을 자동으로 디스플레이하기>>
display 명령어를 이용하면 매 단계가 진행될때마다 자동으로 변수의 값을 출력해준다.

    (gdb) display [변수명]

display 변수를 해제하기 위해서는 undisplay 명령어를 이용한다.

    (gdb) undisplay [N]

display 역시 x,c,o 등등을 이용해 다양한 형태로 출력 가능하다.


출처 : http://kwanseob.blogspot.kr/2012/03/gdb.html

'O / S > Linux' 카테고리의 다른 글

Kali Linux Commands Cheat Sheet  (0) 2015.10.09
Kali linux 부팅 디스크 만들기  (0) 2015.08.21
원격접속과 FTP  (0) 2015.08.16
파일의 접근 권한,setuid,gid,스티키비트,chmod  (0) 2015.08.16
리다이렉션  (0) 2015.08.16


rufus-2.2.exe


이걸로 유일하게 만들어졌다

'O / S > Linux' 카테고리의 다른 글

Kali Linux Commands Cheat Sheet  (0) 2015.10.09
GDB 사용법  (0) 2015.09.05
원격접속과 FTP  (0) 2015.08.16
파일의 접근 권한,setuid,gid,스티키비트,chmod  (0) 2015.08.16
리다이렉션  (0) 2015.08.16

원격접속과 FTP

Kail-KM
|2015. 8. 16. 13:32

#Telnet & SSH

 1.Telnet

텔넷 사용을 위해서는 텔넷 클라이언트와 텔넷 서버가 필요.

Telnet은 수퍼데몬에 의해 동작하기에 xinetd를 설치해야한다.

sudo apt-get install xinetd

...

sudo apt-get install telnetd

...

텔넷 서버를 동작시키려면 /etc/xinetd.conf 파일을 설정해야함

service telnet


        disable = no

        flags = REUSE

        socket_type = stream

        wait = no

        user = root

        server = /usr/sbin/in.telnetd

        log_on_failure = USERID

~

:wq! 를 추가해야함

그후에 

sudo /etc/init.d/xinetd restart 를 통해 활성화시킨다.

***port 23이 열려 있어야함


telnet>open xxxx

...

 2.SSH (Secure Shell)

텔넷에서 텔넷 클라이언트와 리눅스 사이에 주고받는 데이터가 암호화되지 않기에 이를 보완된것이 바로 SSH이다.

...

ssh 192.168.x.x -l user1


#VNC -- p.624


#파일 송수신

FTP는 TCP/IP 프로토콜중 5계층에 있는 프로토콜로, 다른 운영체제와도 파일을 주고 받을수 있다.

 1.FTP서버 설치,설정

sudo apt-get install vsftpd

...

ps -ef | grep vsftpd  : 작동하는지 확인

 2.FTP 클라이언트 사용

ftp 192.168.0.2

...

사용자 : 

암호 :

...

get 파일명 mget 파일명

put 파일명 mput 파일명

prompt hash

bin bye

open user

cd !cd

pwd !pwd

ls !ls

mkdir dir rmdir

 3.익명 FTP 사용

sudo vi /etc/vsftpd.conf

..

anonymous_enable=YES

...

sudo service vsftpd restart

...

id : anoymous

passwd : E-mail

...

'O / S > Linux' 카테고리의 다른 글

GDB 사용법  (0) 2015.09.05
Kali linux 부팅 디스크 만들기  (0) 2015.08.21
파일의 접근 권한,setuid,gid,스티키비트,chmod  (0) 2015.08.16
리다이렉션  (0) 2015.08.16
Linux 디렉터리와 파일다루기  (0) 2015.08.16

#파일의 접근 권한

ls -l 을 할경우

-파일의 종류

-접근권한표시

-하드링크개수

-로그인id

-그룹id

-파일크기

-최종수정날짜

-파일명


flie [filename] : 지정한 파일의 종류를 알려준다

groups [username] : 사용자가 속한 그룹을 알려준다.


표기방법

소유자 그룹 기타사용자

   rwx rwx rwx

접근권한 변경

chmod [option] file&directoryname


*기호모드

u:파일소유자

g:소유자가 속한그룹

o:소유자와 그룹이외의 기타사용자

a:전체사용자


+:권한부여

-:권한제거

=:접근권한설정


r:읽기

w:쓰기

x:실행


*숫자모드

0-7 0-7 0-7

r-x : 4 0 1 = 5

rw- : 4 2 0 = 6

rwx : 4 2 1 = 8


rwxrwxrwx = 777

rwxr-xr-x = 755

rw-rw-rw- = 666

r-xr-xr-x = 555


기본접근권한 확인하고 변경하기

umask [option] [mask value] : 기본 접근권한출력하거나 변경한다.

-S : 마스크 값을 문자로 출력한다.

마스크값

:마스크값이 022 일경우 ----w--w- 에게 권한을 부여하지 않겠다는것

즉, 그룹과 기타사용자에게 쓰기 권한을 부여하지않는다. = 755


특수 접근권한

SetUID : 맨앞자리가 4

SetGID : 맨앞자리가 2

Sticky bit : 맨앞이 1

-1.SetUID : SetUID가 설정된 파일을 실행하면 해당 파일이 실행되는 동안에는 파일을 실행한 사용자의 권한이 아니라 파일 소유자의 권한으로 실행할수 있도록한다.

ex)chmod 4755 set.exe

-2.SetGID : 위의 것과 거의 동일. 파일이 실행되는 동안 파일 소유 그룹의 권한을 쇨행 된다.

ex)chmod 2755 set.exe

-3.스티키비트 : 디렉터리에 스티키 비트가 설정되어 있으면 이 디렉터리에는 누구나 파일을 생성 할 수 있다. 파일은 파일을 생성한 계정으로 소유자가 설정되며, 다른 사용자가 생성한 파일은 삭제 할수 없다. 

기타사용자의 실행권한에 't' 로 표시가 된다.

ex)chmod 1755 temp

'O / S > Linux' 카테고리의 다른 글

Kali linux 부팅 디스크 만들기  (0) 2015.08.21
원격접속과 FTP  (0) 2015.08.16
리다이렉션  (0) 2015.08.16
Linux 디렉터리와 파일다루기  (0) 2015.08.16
Shell 기본 사용법  (0) 2015.08.16

리다이렉션

Kail-KM
|2015. 8. 16. 13:30

#입출력 방향바구기


파일 디스크립터

0  stdin 명령어의 표준입력

1  stdout 명령어의 표준출력

2  stderr 명령어의 표준오류

표준 입출력 장치를 파일로 바꾸는 것을 '리다이렉션'이라한다.

-출력 리다이렉션

파일 덮어쓰기 : >

명령 1> 파일이름

명령 > 파일이름

(확인을 할때는 cat을 통해 확인을 한다.)

파일에 내용추가 : >>

명령 >> 파일이름


-오류 리다이렉션

오류메세지를 위의 출력 리다이렉션처럼 > 으로 한다면 리다이렉션이 

되지 않는다.

명령 2> 파일이름

***결과를 무조건 '>'으로 담을수 있는 것이아니라 성공메세지는

1> 을 통하여 실패메세지는 2>를 통하여 리다이렉션 할 수 있다.

  //한번에 리다이렉션하기 ls ./abc>ls.out 2>ls.err

  //오류 메세지 버리기 /dev/null은 버리고 싶은 내용을 담는 장치 파일로 이  파일에 전달된 모든 내용은 시스템에서 사라지고 복구할 수 없다.

  //한파일로 리다이렉션하기 ls ./abc>lsout 2>&1

(표준출력파일은 &1이라고 표현한다.) 

-입력 리다이렉션

< : 표준 입력을 바꾼다.

명령 0<파일이름

명령 < 파일이름

cat 명령이 파일을 읽어서 출력하는 기능은 표준 입력을 자동으로 파일로 리다이렉션 한 것으로 < 를 생략한 것이다.

'O / S > Linux' 카테고리의 다른 글

원격접속과 FTP  (0) 2015.08.16
파일의 접근 권한,setuid,gid,스티키비트,chmod  (0) 2015.08.16
Linux 디렉터리와 파일다루기  (0) 2015.08.16
Shell 기본 사용법  (0) 2015.08.16
Kali Linux 2.0 Adob Flash Install  (0) 2015.08.14