
Reference : http://www.hacoder.com/2015/09/kali-linux-commands-cheat-sheet/

Kali Linux commands cheat sheet. All basic commands from A to Z in Kali Linux has been listed below.
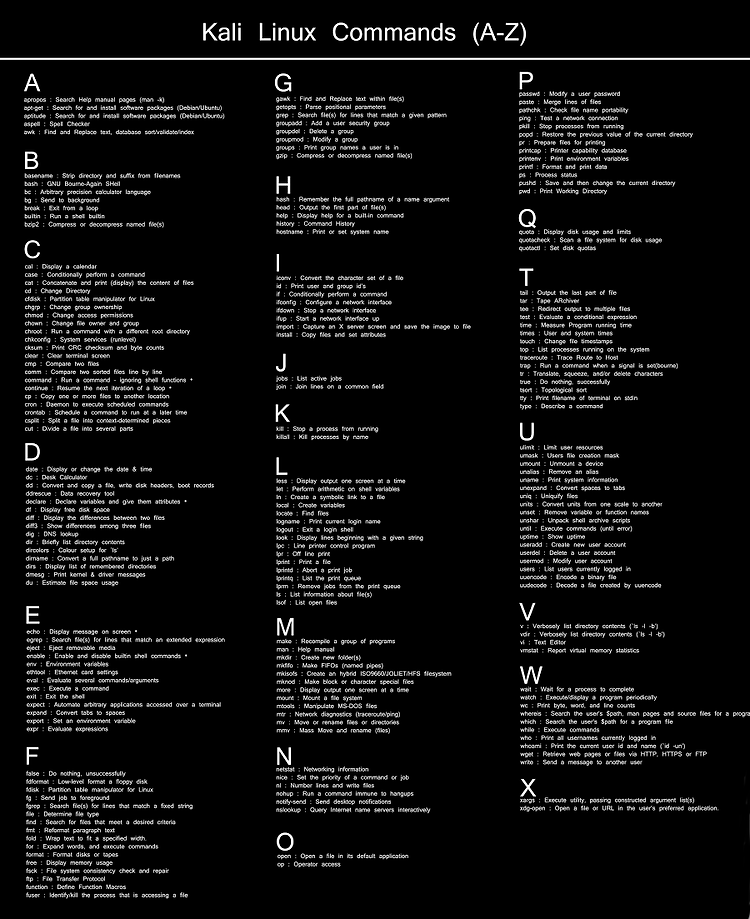
A
- apropos : Search Help manual pages (man -k)
- apt-get : Search for and install software packages (Debian/Ubuntu)
- aptitude : Search for and install software packages (Debian/Ubuntu)
- aspell : Spell Checker
- awk : Find and Replace text, database sort/validate/index
B
- basename : Strip directory and suffix from filenames
- bash : GNU Bourne-Again SHell
- bc : Arbitrary precision calculator language
- bg : Send to background
- break : Exit from a loop
- builtin : Run a shell builtin
- bzip2 : Compress or decompress named file(s)
C
- cal : Display a calendar
- case : Conditionally perform a command
- cat : Concatenate and print (display) the content of files
- cd : Change Directory
- cfdisk : Partition table manipulator for Linux
- chgrp : Change group ownership
- chmod : Change access permissions
- chown : Change file owner and group
- chroot : Run a command with a different root directory
- chkconfig : System services (runlevel)
- cksum : Print CRC checksum and byte counts
- clear : Clear terminal screen
- cmp : Compare two files
- comm : Compare two sorted files line by line
- command : Run a command – ignoring shell functions •
- continue : Resume the next iteration of a loop •
- cp : Copy one or more files to another location
- cron : Daemon to execute scheduled commands
- crontab : Schedule a command to run at a later time
- csplit : Split a file into context-determined pieces
- cut : Divide a file into several parts
D
- date : Display or change the date & time
- dc : Desk Calculator
- dd : Convert and copy a file, write disk headers, boot records
- ddrescue : Data recovery tool
- declare : Declare variables and give them attributes •
- df : Display free disk space
- diff : Display the differences between two files
- diff3 : Show differences among three files
- dig : DNS lookup
- dir : Briefly list directory contents
- dircolors : Colour setup for `ls’
- dirname : Convert a full pathname to just a path
- dirs : Display list of remembered directories
- dmesg : Print kernel & driver messages
- du : Estimate file space usage
E
- echo : Display message on screen •
- egrep : Search file(s) for lines that match an extended expression
- eject : Eject removable media
- enable : Enable and disable builtin shell commands •
- env : Environment variables
- ethtool : Ethernet card settings
- eval : Evaluate several commands/arguments
- exec : Execute a command
- exit : Exit the shell
- expect : Automate arbitrary applications accessed over a terminal
- expand : Convert tabs to spaces
- export : Set an environment variable
- expr : Evaluate expressions
F
- false : Do nothing, unsuccessfully
- fdformat : Low-level format a floppy disk
- fdisk : Partition table manipulator for Linux
- fg : Send job to foreground
- fgrep : Search file(s) for lines that match a fixed string
- file : Determine file type
- find : Search for files that meet a desired criteria
- fmt : Reformat paragraph text
- fold : Wrap text to fit a specified width.
- for : Expand words, and execute commands
- format : Format disks or tapes
- free : Display memory usage
- fsck : File system consistency check and repair
- ftp : File Transfer Protocol
- function : Define Function Macros
- fuser : Identify/kill the process that is accessing a file
G
- gawk : Find and Replace text within file(s)
- getopts : Parse positional parameters
- grep : Search file(s) for lines that match a given pattern
- groupadd : Add a user security group
- groupdel : Delete a group
- groupmod : Modify a group
- groups : Print group names a user is in
- gzip : Compress or decompress named file(s)
H
- hash : Remember the full pathname of a name argument
- head : Output the first part of file(s)
- help : Display help for a built-in command
- history : Command History
- hostname : Print or set system name
I
- iconv : Convert the character set of a file
- id : Print user and group id’s
- if : Conditionally perform a command
- ifconfig : Configure a network interface
- ifdown : Stop a network interface
- ifup : Start a network interface up
- import : Capture an X server screen and save the image to file
- install : Copy files and set attributes
J
- jobs : List active jobs
- join : Join lines on a common field
K
- kill : Stop a process from running
- killall : Kill processes by name
L
- less : Display output one screen at a time
- let : Perform arithmetic on shell variables
- ln : Create a symbolic link to a file
- local : Create variables
- locate : Find files
- logname : Print current login name
- logout : Exit a login shell
- look : Display lines beginning with a given string
- lpc : Line printer control program
- lpr : Off line print
- lprint : Print a file
- lprintd : Abort a print job
- lprintq : List the print queue
- lprm : Remove jobs from the print queue
- ls : List information about file(s)
- lsof : List open files
M
- make : Recompile a group of programs
- man : Help manual
- mkdir : Create new folder(s)
- mkfifo : Make FIFOs (named pipes)
- mkisofs : Create an hybrid ISO9660/JOLIET/HFS filesystem
- mknod : Make block or character special files
- more : Display output one screen at a time
- mount : Mount a file system
- mtools : Manipulate MS-DOS files
- mtr : Network diagnostics (traceroute/ping)
- mv : Move or rename files or directories
- mmv : Mass Move and rename (files)
N
- netstat : Networking information
- nice Set : the priority of a command or job
- nl Number : lines and write files
- nohup : Run a command immune to hangups
- notify-send : Send desktop notifications
- nslookup : Query Internet name servers interactively
O
- open : Open a file in its default application
- op : Operator access
P
- passwd : Modify a user password
- paste : Merge lines of files
- pathchk : Check file name portability
- ping : Test a network connection
- pkill : Stop processes from running
- popd : Restore the previous value of the current directory
- pr : Prepare files for printing
- printcap : Printer capability database
- printenv : Print environment variables
- printf : Format and print data •
- ps : Process status
- pushd : Save and then change the current directory
- pwd : Print Working Directory
Q
- quota : Display disk usage and limits
- quotacheck : Scan a file system for disk usage
- quotactl : Set disk quotas
R
- ram : ram disk device
- rcp : Copy files between two machines
- read : Read a line from standard input
- readarray : Read from stdin into an array variable
- readonly : Mark variables/functions as readonly
- reboot : Reboot the system
- rename : Rename files
- renice : Alter priority of running processes
- remsync : Synchronize remote files via email
- return : Exit a shell function
- rev : Reverse lines of a file
- rm : Remove files
- rmdir : Remove folder(s)
- rsync : Remote file copy (Synchronize file trees)
S
- screen : Multiplex terminal, run remote shells via ssh
- scp : Secure copy (remote file copy)
- sdiff : Merge two files interactively
- sed : Stream Editor
- select : Accept keyboard input
- seq : Print numeric sequences
- set: Manipulate shell variables and functions
- sftp : Secure File Transfer Program
- shift : Shift positional parameters
- shopt : Shell Options
- shutdown : Shutdown or restart linux
- sleep : Delay for a specified time
- slocate : Find files
- sort : Sort text files
- source : Run commands from a file `.’
- split : Split a file into fixed-size pieces
- ssh : Secure Shell client (remote login program)
- strace : Trace system calls and signals
- su : Substitute user identity
- sudo : Execute a command as another user
- sum : Print a checksum for a file
- suspend : Suspend execution of this shell
- symlink : Make a new name for a file
- sync : Synchronize data on disk with memory
T
- tail : Output the last part of file
- tar : Tape ARchiver
- tee : Redirect output to multiple files
- test : Evaluate a conditional expression
- time : Measure Program running time
- times : User and system times
- touch : Change file timestamps
- top : List processes running on the system
- traceroute : Trace Route to Host
- trap : Run a command when a signal is set(bourne)
- tr : Translate, squeeze, and/or delete characters
- true : Do nothing, successfully
- tsort : Topological sort
- tty : Print filename of terminal on stdin
- type : Describe a command
U
- ulimit : Limit user resources
- umask : Users file creation mask
- umount : Unmount a device
- unalias : Remove an alias
- uname : Print system information
- unexpand : Convert spaces to tabs
- uniq : Uniquify files
- units : Convert units from one scale to another
- unset : Remove variable or function names
- unshar : Unpack shell archive scripts
- until : Execute commands (until error)
- uptime : Show uptime
- useradd : Create new user account
- userdel : Delete a user account
- usermod : Modify user account
- users : List users currently logged in
- uuencode : Encode a binary file
- uudecode : Decode a file created by uuencode
V
- v : Verbosely list directory contents (`ls -l -b’)
- vdir : Verbosely list directory contents (`ls -l -b’)
- vi : Text Editor
- vmstat : Report virtual memory statistics
W
- wait : Wait for a process to complete
- watch : Execute/display a program periodically
- wc : Print byte, word, and line counts
- whereis : Search the user’s $path, man pages and source files for a program
- which : Search the user’s $path for a program file
- while : Execute commands
- who : Print all usernames currently logged in
- whoami : Print the current user id and name (`id -un’)
- wget : Retrieve web pages or files via HTTP, HTTPS or FTP
- write : Send a message to another user
x
- xargs : Execute utility, passing constructed argument list(s)
- xdg-open : Open a file or URL in the user’s preferred application.
'O / S > Linux' 카테고리의 다른 글
| GDB 사용법 (0) | 2015.09.05 |
|---|---|
| Kali linux 부팅 디스크 만들기 (0) | 2015.08.21 |
| 원격접속과 FTP (0) | 2015.08.16 |
| 파일의 접근 권한,setuid,gid,스티키비트,chmod (0) | 2015.08.16 |
| 리다이렉션 (0) | 2015.08.16 |
 rufus-2.2.exe